
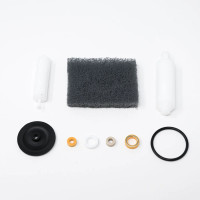

Example of polymer side vs. energizer side of seal.
Note: Stainless steel energizer shown. Seal may also feature a fluoropolymer O-ring energizer (black O-ring).
Proper HPLC pump maintenance is important for consistent performance and longer system life. One of the most important service items is the piston seal, a small but critical component that helps maintain accurate, leak-free pumping. Knowing when to replace an HPLC piston seal and how to condition the new seal correctly helps reduce downtime and maintain stable flow.
When to Replace an HPLC Piston Seal
Chrom Tech recommends replacing piston seals every six months as part of scheduled preventative maintenance, or sooner when the pump operates continuously. In general, seals last about 1,000 hours of operation, depending on solvent type and overall system conditions. For dual-piston pumps, both seals should be replaced at the same time.
Common Signs of Worn Piston Seals
- Fluctuating or reduced system pressure
- Visible solvent leaks around the pump head
- Inconsistent flow rates or noisy operation
These symptoms often indicate that the piston seal is worn or that debris or crystallized solvent is interfering with proper sealing.
How to Replace a Piston Seal on a Chrom Tech HPLC Pump
Removing the Old Seals
- Remove the pump head and self-flush assemblies.
- Remove the backup washer if present.
- Insert the flanged end of the seal insertion and removal tool into the seal cavity. Tilt gently so the flange slides under the seal, then pull the seal out.
- Repeat the process for the low-pressure seal in the flush housing.
Installing New Seals
- Place the high-pressure seal on the tool with the energizer facing outward. Insert it carefully into the pump head and withdraw the tool so that only the polymer side remains visible.
- Repeat for the self-flush seal in the flushing housing. If the self-flush feature is not used, install the provided guide bushing instead.
- Replace the backup washer over the high-pressure seal.
- Reattach the self-flush and pump head assemblies.
- Condition the seals before returning the pump to service.
Conditioning New Piston Seals
Conditioning helps new seals seat properly and perform correctly. Use only organic solvents for conditioning, not buffer or salt solutions. Recommended solvents include HPLC-grade methanol, isopropanol, or 50:50 water mixtures of either solvent.
| Flow Rate Setting | Pressure (psi) Phase 1 | Pressure (psi) Phase 2 |
|---|---|---|
| 20–30% of Maximum Pump Flow | 1,000* | 1,500* |
| * Or 95% of maximum pump capability | ||
Run the pump with a 50:50 methanol or isopropanol and water mixture for 30 minutes in Phase 1, then another 15 minutes in Phase 2 at the pressures shown above.
Inspecting and Cleaning the Piston
Whenever piston seals are replaced, inspect the piston rod with a 10x magnifier for scratches or glazed areas. Damaged pistons should be replaced because surface imperfections can quickly shorten seal life and cause leaks.
Cleaning Steps
- Remove the pump head and flush housing.
- Carefully remove the backup seal plate from the pump housing using a small screwdriver or toothpick.
- Hold the piston by its metal base, not the sapphire rod, and remove it from the carrier slot.
- Clean it with the included scouring pad by rubbing gently along the piston length while rotating the pad to cover all surfaces. Avoid sideways pressure.
- Wipe the piston with a lint-free cloth dampened in alcohol before reinstalling.
Replacing the Piston
- Remove the pump head and self-flush assemblies.
- Grasp the piston by the metal base and remove it from the slot.
- Insert the replacement piston into the carrier slot until fully seated.
- Reinstall the pump head.
Use the Self-Flush Feature to Extend Seal Life
The self-flush pump head continuously rinses the piston surface to help prevent salt or solvent buildup behind the seal. This can improve seal life by reducing abrasion and drying, especially when pumping buffers, acids, bases, or volatile solvents such as THF or acetone.
Recommended flush solutions include:
- 100% Isopropanol (IPA)
- 100% Methanol
- 20% IPA/water or 20% Methanol/water
Do not use only water, including DI, tap, or filtered water, as a flush solvent.
Preparing the HPLC Pump for Storage
Before storage, flush the pump with isopropanol to help protect internal components.
- Disconnect the outlet tubing.
- Place the inlet filter in isopropanol and draw 50 mL through the pump using a syringe.
- Pump 5 mL of isopropanol through the system to purge the lines.
- Plug or cover the outlet port and store the inlet filter in a sealed bag attached to the tubing.
Maintaining Reliable Pump Performance
Regular piston seal replacement and proper seal conditioning help maintain consistent HPLC pump performance and reduce unexpected downtime. Inspecting the piston during seal changes and using the self-flush feature correctly can further improve seal life, especially in demanding solvent systems.
Chrom Tech offers a range of HPLC accessories, including Agilent-compatible replacement parts and components for other pump models. For help selecting the right parts or replacement seal kits, contact Chrom Tech technical support.